Product review (and lot's of tips): Hustler Raptor X Zero Turn Lawn Mower
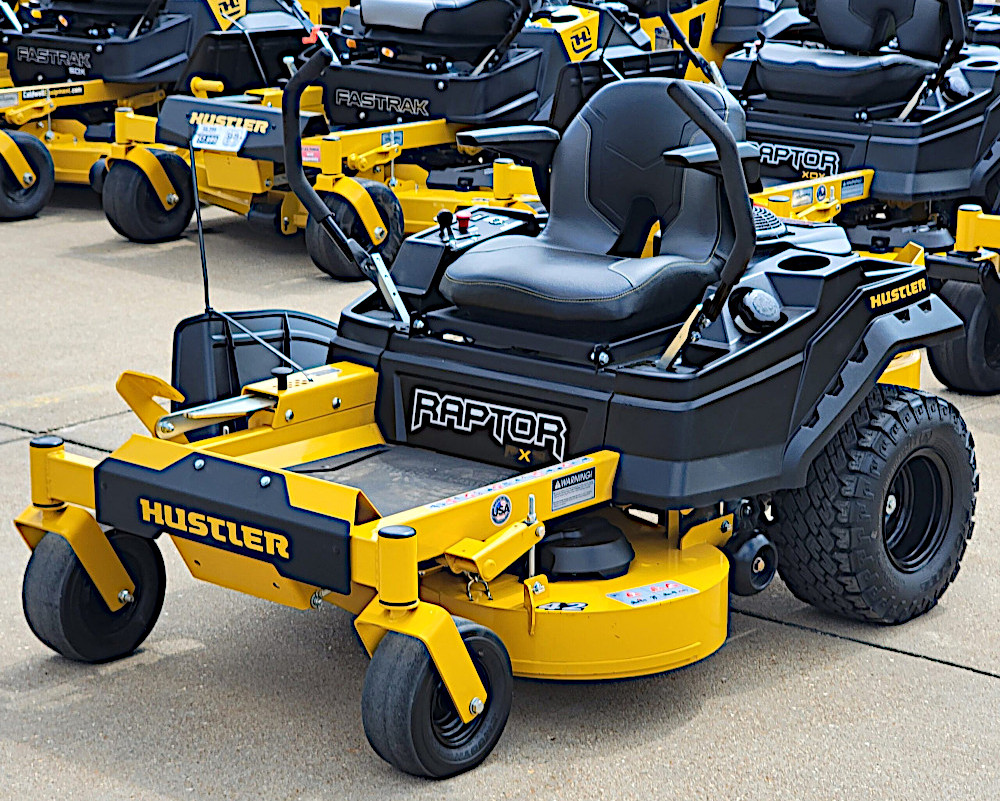
Table of Contents
intro
This is a review of a 2022 model Hustler Raptor X zero turn (ZTR) lawn mower with a 42 in. deck. I bought this machine for mowing small yards with lots of obstacles and have owned it for more than a year prior to writing this review.
Having far more experience with larger, commercial ZTR mowers, i can confidently state that the Raptor X does not perform like a commercial machine. That said, i think it is indeed a good quality, home owner class mower that is well built and worth it's 2022 price of around $4,000, especially for a machine that's made by a U.S. company. Whether that amount of cash is a wise investment for the typical home owner is certainly debatable, but once you use a zero turn mower there's simply no reverting back to a tractor, especially if you pattern mow.
the good
'Dennis' does a very nice review of his 2021 Raptor X which is nearly identical to my 2022 model with the exception that he went with the larger 54 inch deck and motor combination. I highly suggest watching his review to better understand my comments. One thing i would disagree with is his comments about mowing slopes which aren't entirely accurate and this is perfectly understandable as this was his first ZTR and they do handle very differently than a lawn tractor ('very'='extremely'). It is perfectly fine and quite preferable to traverse a slope rather than mowing it from bottom to top as 'Dennis' wrongly suggests, as long as it isn't too steep and this is how all the commercial guys do it up to roughly 35 or even 40+ degrees (the Raptor X is limited to a 25 degree incline - more on that later). On a side note, if you watch his other videos about his Raptor, 'Dennis' provides incorrect and potentially very costly misinformation in his Adjust Steering Tracking Hustler Raptor Zero Turn video. This is NOT how you adjust tracking and 'Dennis' isn't the first one to make this potentially catastrophic mistake. What he's adjusting is the neutral point of the transaxle, not tracking, and although the neutral point adjustment does indeed affect tracking, doing it as he suggests can easily cost you many hundreds of dollars when you destroy a transmission!
the bad
Since i'm most familiar with Ferris commercial units in the $10,000+ price range, much of what i have to say about the Raptor will be an admittedly unfair comparison of these very different classes of mowers, and one of the first things anyone coming from a commercial ZTR will notice is the Raptor's lack of suspension. The rectangular, single piece, steel tube frame of the Raptor is very rigid, which is good, but that means there's nothing to absorb the bumps other than the pneumatic tires, all 4 of which are to be pressurized to around 8 to 12 PSI (or 8 to 10 PSI according to which manual you read). I tend to run the pressure on the low side to help with traction and bump absorption. The maximum speed of the machine is about 7 MPH, however mowing at that speed on anything other than a golf course is pretty much out of the question unless you purchase Hustler's 'Flex Forks' for the front casters which help a lot more with the bumps than i expected, but they aren't cheap.
Another issue that was readily apparent with the 42 in. deck of the Raptor is the anti-scalp wheel. Notice i said "wheel" and not "wheels" because there is literally only one and it's located on the left rear of the deck. You can see it located in front of the drive wheel in the opening image of this article. The fact that there's only one however is irrelevant because it's utterly useless anyway. The anti-scalp wheel can be mounted in one of two positions, either the top or bottom hole of its mounting bracket, though even when mounted in its lowest position, the bottom of the wheel is about even with the bottom of the deck which means it doesn't actually get used. I don't know what the engineer was thinking here. The good news is that this is the only "serious" design flaw i've noticed thus far and given the short wheelbase of this little machine, i'm not sure proper anti-scalp wheels would be very effective anyway unless you cut your grass awfully short which you really shouldn't be doing. Besides, if you're going to scalp, you need to hit the foot pedal and raise the deck rather than rely on anti-scalp wheels. I ended up removing the thing since all it ever did was rattle. I also typically cut no shorter than 3 inches which is the minimum recommended cut height for grass in general. This apparently provides for healthier, thicker grass with fewer weeds and the extra shade it provides helps retain moisture in the ground during those dry spells.
While we're still in 'knock the Raptor' mode, let's talk about another aspect of the deck. The deck is fabricated rather than stamped which is not only a good thing, but is apparently virtually unheard of at this price point. The problem is that the left front of the deck is contoured to the left side blade, meaning it's rounded. So what's the problem? Buckhorn. Any fast growing weed like buckhorn, or dandelions, or even tall grass, has a tendency to bend around the left side of the deck rather than getting sucked under it. This isn't a problem if you mow wheel-to-wheel, but it is if you mow from deck edge to deck edge. We'll address a potential fix for this issue later.
Another tiny gripe is that you have to use a socket to remove the single bolt that holds the floor pan in place, another shortcoming we'll fix later. Removing the pan allows for easy cleaning and inspection of the deck belt and pulleys.
At only 18 inches in diameter, the drive tires take some real getting used to regarding traction (or lack thereof) if you're coming from a commercial mower, especially when reversing. With a commercial Ferris one can stop, change directions and reverse course fairly quickly without tearing up the grass, but with the lighter Raptor and its smaller tires i found it necessary to be significantly more gentle with the controls when reversing despite its exclusive "Big Bite" tires. While it's not terribly difficult to spin a wheel when backing up with any zero turn, the Raptor pretty much requires pulling both sticks back slowly and equally before initiating the 'Y' turn maneuver to line up for your next pass, even on dry, level ground. Traction is fine going forward, though traversing slopes exceeding 25 degrees for an extended period of time is a no-no according to the engine manual, else the engine loses its lubrication. In my case this isn't a problem, but it is a bit of a disappointment considering one can easily do 35+ degrees with a commercial machine, the limiting factor being the size of the operators coconuts more than anything else. By the way, i only found the 25 degree thing in the engine manual after going through it more thoroughly for this review. My excuse for not reading it sooner is because IT'S A LAWN MOWER ENGINE! Who the hell needs a manual for a lawn mower en....... never mind.

The Raptor owners manual says to change the engine oil every 50 hours and the filter every 100. That didn't sound right so i checked the engine manual for the Kawasaki FR600V and it says to change it every 100 hours and the filter every 200. That sounds more like it, though i expect you could go far longer with a true, high quality synthetic oil (not all "synthetic" oils are synthetic).
There's no roll bar or seat belt on the Raptor X, however given its intended purpose and limitations, there's hardly a need for such features.
The engine exhaust is fairly loud. I don't know why the hell small engine manufacturers for mowers refuse to make a quiet exhaust. We can do it for cars, generators, motorcycles, airplanes, whatever, so why not lawn mowers? I wouldn't say the Raptor is louder than a commercial mower, but it's comparable. While you can buy muffler extensions that will further quieten the thing, they will likely rob a bit of power and we just can't have that, even though the Raptor has enough to spare.
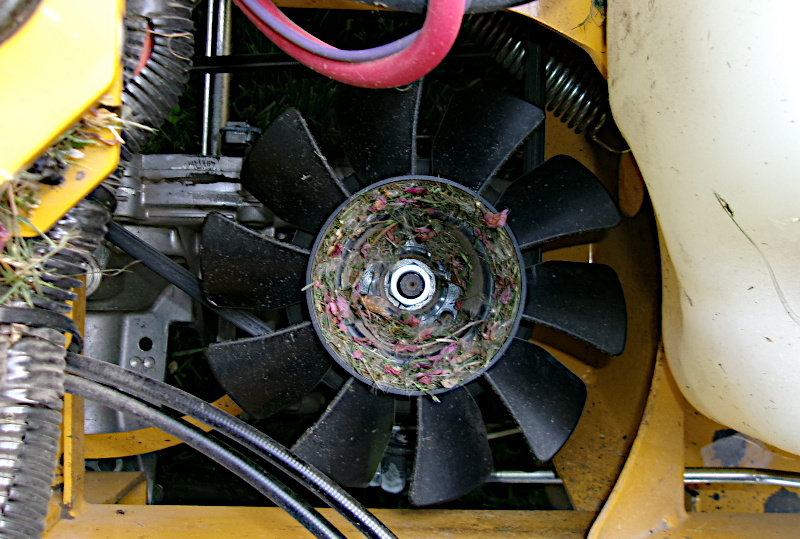
The cooling fans for the hydraulic pumps have a large, deep hub where grass clippings accumulate. It's not really an issue, but it would have been nice had Hustler spent an extra 2 cents and installed some plastic caps over them. This is another issue we'll take care of later.
The rather large deck discharge chute is a bloody nuisance, as they all are. At first i did what any commercial guy does; i ignored the warnings of imminent death and promptly discarded it. I don't know what it is with the Raptor, but it seems to throw clippings quite far, even with its standard lift blades, and this can be a bit of an issue when you don't want to toss grass clippings into the next zip code. I ended up hacking the discharge chute into pieces in order to make a chute blocker as you'll see later.
The deck does not stripe a lawn well at all in my experience, even with a 1/4 inch forward blade pitch. This is a non-issue for me given that most of the lawns i do are small and have many obstacles that often make pattern mowing rather pointless. Stripe kits are available of course but they are quite pricey for what you get and it's rather trivial to make one yourself that is every bit as effective and much less expensive. The rear of the engine mounting plate has 2 square holes which will accept 1/4 inch carriage bolts and this would make it very easy to hang from it something like a stiff mud flap for striping grass.
The rubber mat where you place your feet is attached with 6 plastic push-ins to a surprisingly robust steel foot rest pan. This arrangement allows a lot of debris to collect under the mat, a problem which i solved by gluing the mat to the floor pan with some spray adhesive. The weight of the foot pan is intriguing. It's not at all unwieldy, but it certainly doesn't need to be that heavy and so i have to wonder whether Hustler is using it as a counterweight to make the front end heavier.
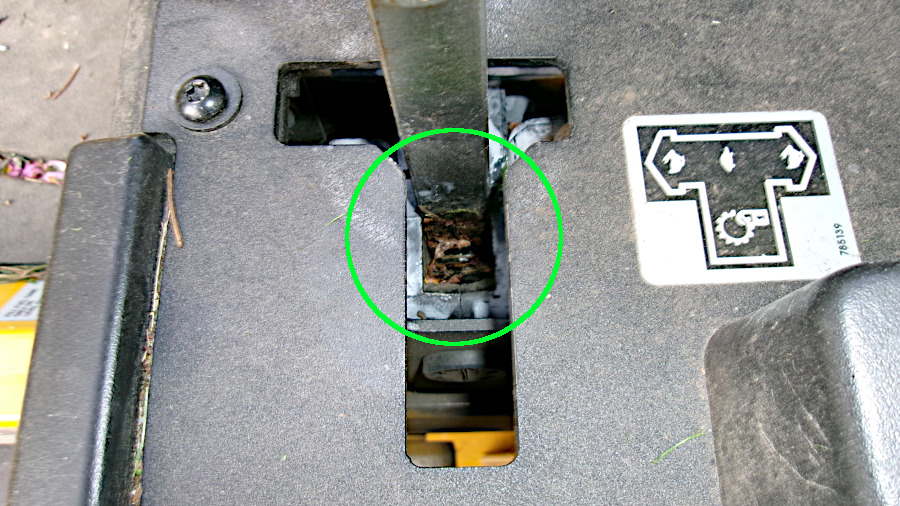
Another issue which i suspect has bitten plenty of people is the poor design of the drive control lever hinge points. The problem here is that debris collects in the hinge and once enough debris is deposited there, the engine won't start due to the safety switch not engaging. Hemostat's or a flat blade screw driver work well for removing the debris if you don't have an air compressor.
Regarding the seating, Hustler must think the average person is about the size of one of those little gray aliens because the way the seating and drive control arrangement was set up was quite cramped. Thankfully the seat, which is actually really comfortable, is somewhat adjustable insomuch as it can be slid fore and aft a few inches by loosening it's mounting bolts. The drive/steering levers can also be adjusted fore and aft as well as in height in order to accommodate the operator. While there is ample adjustment to accommodate an average size adult, if your one of those 6+ footer guys you may want to consider a larger machine. By the way, i tend to move the seat all the way back on every zero turn in order to shift my weight toward the drive wheels which helps a bit with traction and when traversing steep slopes, however the opposite would be better if you have to mow really steep slopes from bottom to top. We don't ever mow from top to bottom on steep slopes with a ZTR for reasons which will become immediately apparent if you attempt it. By the way, i think most cell phones automatically provide your location when you dial 911. Just sayin'.
more good
Okay, enough whining. Let's consider the many pluses!
I think the Raptor X is a good little machine, i really do. For around 4 grand one cannot possibly belittle it for not having suspension or having a deck with a rounded corner for cripes sake. Hustler designed this machine for the home owner with a small-ish yard and i think it performs quite well in that regard. It's made in the U.S., it's well built, it has a fabricated deck, it's warranted for 3 years and the maintenance couldn't possibly be any simpler. There is little to maintain other than the engine and blades. There is nothing to grease and the hydraulic transaxles are sealed and maintenance free, though that will be a negative to some folks given that hydraulic system parts are extremely expensive to replace if you manage to damage them. Regardless of their maintenance free designation, you can change the oil as i opted to do. The 2 cylinder Kawasaki engine is carborated so it's certainly best to run ethanol-free gas, but other than fueling it, keeping the blades sharp and checking the engine oil and the air pressure in the tires, there's little else to do on a regular basis.
Some of the lawns i mow with the little Raptor are pretty rough. One property in particular should be classified as off limits to humans. There are piles of garbage, cars, car parts, boards, nails, glass, cinder blocks, bricks, rocks, holes, dog shit and all sorts of other interesting obstacles. On the first mowing, which was months overdue, i ran over what appeared to be the tubular metal frame of a folding lawn chair, which of course i never saw since the grass was up to my knees. The entanglement stopped the left blade instantly and the motor with it. I thought for sure i had busted something but other than the right-side blade unscrewing itself, there was no apparent damage. I was totally impressed that i hadn't even bent the blade or broken a spindle. Another section of this mine field hadn't been mowed for at least a year or twelve and so the grass was up to my balls and very thick, yet the Raptor's 18 HP engine plowed through it quite nicely, albeit at a slower pace and taking a half cut at a time. Of course a double/triple cut was necessary but a commercial machine couldn't have gotten the job done all that much faster.
On another occasion of a first cut on an overgrown lawn i whacked a tree stump i didn't see which, again, stopped the engine dead. I expected this would have broken a spindle for sure, or at least bent the blade, but once again there was no apparent damage and i'm not hearing any bearing noise from the spindle. How the small blade spindles and the narrow deck belt on the Raptor can handle that kind of abuse, i don't know, but i suspect there are few if any zero turn's in this price range that could withstand such torture. Due to experience, i'm 99.999% certain that the cheap cast spindles on the little 42 inch Cub Cadet ZTR, which is equipped with an inferior stamped deck, would have exploded in this instance. All that said, i did manage to bust a deck belt once by running over a garden hose of all things. Weird.
One of my requirements, even in a cheap zero turn, was arm rests and they are standard on the Raptor X, yet another feature that isn't typically found in this price range. Granted the plastic arm rests are a bit cheesy feeling and lack padding, and besides being able to fold up, aren't adjustable, but at least they're there. If you spend much time on a ZTR, my guess is that you'll appreciate arm rests, both for comfort and precision when pattern mowing.
The Raptor is available with a 42 or 54 inch deck, the former of which comes with a 603 CC, 4-stroke, 18 HP Kawasaki and the latter with a 726 CC, 21.5 HP power plant of the same brand. Given the lawns i mow, the 42 inch deck is a perfect size and 18 HP is more than enough, regardless of how tall the grass is. I have to say that i'm quite impressed with the power of this little machine, though with that power comes increased fuel consumption. Water injection anyone? Hmmm. Regarding fuel, the tank is small and there's no gauge, but it seems to last for roughly 4 hours.
Unlike the Ferris mowers i run, the Raptor has a magnetic deck height adjustment pin. While this may seem trivial, it's actually a very welcome touch compared to the older Ferris' where you have to pull a quick release pin, then pull the deck adjustment pin, then adjust the deck and replace both pins. Unlike the Ferris however, you cannot lock the deck at its highest position without moving the deck pin. Whoop-de-do. Like the deck adjustment system on commercial machines, the Raptor has a proper inch scale instead of just arbitrary numbers and the deck is adjustable in 1/4 inch increments.
Unlike some machines, you don't have to be sitting in the seat to start the engine. Why some manufactures incorporate this "safety" feature i'll never know. Do you have to be sitting in your car to start it? As with any other reputable brand, the logical safety features are all there; the drive controls must be in the park position and the deck must be disengaged before the engine will crank and you must be sitting in the seat before the deck can be engaged. Such safety features are common to pretty much all mowers nowadays and with them comes more complexity in the form of wiring and switches. These 'interlock' systems are common points of failure and this often leads to owners bypassing them which is generally not a great idea. Hustler didn't use waterproof electrical connections, though i'm not sure other brands do either. Besides, mowing in the rain, or when the grass is wet, is a big no-no anyway, however those living in a salty environment would do well to waterproof the connectors. And no, the blades don't quit spinning when reversing, unlike some goofy home owner machines.
The Raptor's park brake is more like that on an automatic car transmission where, when you stick the drive levers in park, the rear wheels are mechanically locked. While this is an intuitive and convenient way to lock the wheels, i have noticed that, when i'm in a hurry, it is possible to move the drive controls out of their park position and into the forward position without the parking mechanism disengaging, though this has been easy to avoid since becoming aware of the issue.
And of course the number one feature of the Raptor X is that it has a beer coffee cup holder! It also has 2 decent sized cavities in its plastic fenders for carrying bug spray, gloves, your loved ones ashes and clippers to cut those damned pricker bushes that always seem to protrude from the woody edges of a lawn for the explicit purpose of putting holes in you or your tires, sometimes both if you're as fortunate as i am.
blade pitch (aka 'deck leveling')
Having a bit of forward blade pitch is more important than you might realize! Proper blade pitch can reduce the strain on the motor and helps evacuate clippings from the deck. Most people call this "deck pitch" or "deck leveling", but it's really blade pitch we're talking about and adjusting the pitch on the Raptor is a simple affair requiring only a 9/16 wrench and a block of wood or a deep-well socket. The trick here is to ignore the manual and do it the correct way as other manufacturers suggest.
Adjusting the deck hangers must be done on a reasonably flat surface, such as a concrete pad that you've actually checked for flatness. Whether the surface is perfectly level doesn't matter, but it needs to be flat. It's also crucial that the blades are not bent and the tires are evenly inflated. Eden Lawn Services has a video that does a pretty good job of explaining how to set blade pitch and so does Exmark, but there's something that both miss i think. Here's what i do:
- Set the tire pressure for all 4 tires.
- Make yourself a block of a known size, like 3 or 4 in., or you could use a deep-well socket as long as its length is even to 1/4 of an inch or whatever your deck height adjustment intervals are. Set the deck to the same height as your block.
- This is the step that no one seems to mention: have someone that's about the same weight as you sit on the mower. This is particularly important if your mower has a suspension system, which the Raptor X does not unless you install the Flex Forks.
- With one of the blades parallel to the length of the machine, place the block under the front cutting edge at the very end of the blade and adjust the front deck hanger on that side of the machine so the block barely fits under the blade.
- Place the block under the opposite end of the same blade and adjust the rear deck hanger so there's about a 1/8 in. to 1/4 in. gap between the block and the very tip of cutting edge of the blade. You may need to fiddle with the deck hangers on the other side of the deck to obtain the desired blade pitch.
- Repeat the process for the blade on the other side of the deck, making sure the blade is parallel with the machine. If you can't get the deck to sit just right, that's OK. Just proceed to the next step.
- Keep rechecking both blades and fine tuning the deck hangers to achieve the desired blade pitch since any adjustment to one side of the deck will affect the other. When you're done, make sure there's equal tension on all 4 deck hangers. If equal tension cannot be achieved, and the blades are not bent, and the surface you're working on is truly flat, then it's possible that the deck is twisted, or a spindle is out of whack, or your tires are not the same size despite having the same air pressure (not uncommon).
If you want to be super anal when setting blade pitch, start by measuring the circumference of the tires after setting their pressure. Don't be surprised if the rear tires, or the front caster tires, have a different circumference and, if they do, adjust air pressure until they match. Next, place some blocks under the deck and drop the deck on to the blocks to take the weight of the deck off of the frame, then twist the front casters and make sure there's equal pressure on them. If there isn't, start looking for problems such as a twisted frame, bad wheel bearings, loose transaxles, unevenly worn tires, etc.. Once the frame is set correctly, you can then adjust the deck as previously described.
mods
chute blocker
I hacked the original deck chute into 2 pieces and assembled them with small bolts to make a flap that closes off the deck discharge opening. This works great for mulching leaves and preventing the deck from shooting debris at cars and other objects where it's not possible to direct clippings in the opposite direction. The cord in the image bellow is used to hold the flap open. It runs through a "U" bracket and the knots in it allow for placing the flap in 3 different positions. In its middle position the flap acts much like a normal discharge chute and the other 2 positions are fully open and fully closed. On the inside of the chute blocker i attached a flat metal bracket that's a bit longer than the deck discharge opening is wide which prevents the plastic chute blocker from losing it's shape or contacting the mower blade. You can of course buy a chute blocker, but they are quite expensive and some of them are not at all compact and thus can catch on bushes and such while mowing.
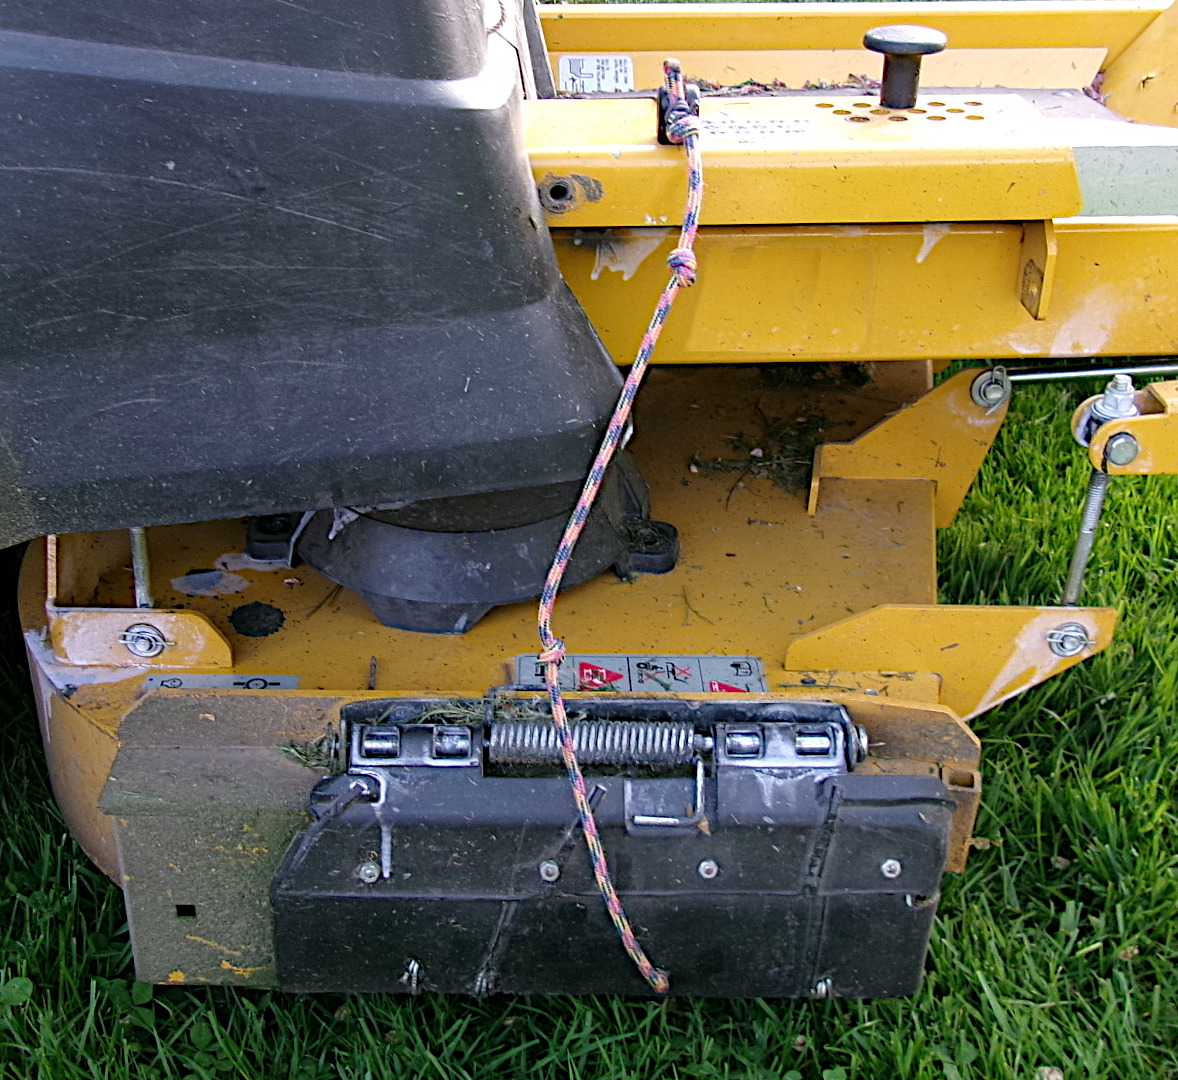
If you're mowing where there's people within an Apollo Moon shot, do not run with the stock chute or flap all the way up! You'd be surprised how far even a push mower can launch a golf ball (i was about ready to slap my neighbor that day but i didn't feel like walking that far). Don't ever run a lawn mower anywhere near people. Fathers have killed their children by ignoring this most basic safety rule.
flex forks
I didn't expect Hustler's optional Flex Forks to make much of a difference, especially since there is no suspension on the drive wheels, but in fact the difference is rather remarkable and i find i'm mowing at higher speeds than without them. Granted, the Flex Forks can't hold a candle to a proper suspension system, but they are (almost) worth the cost in my opinion.
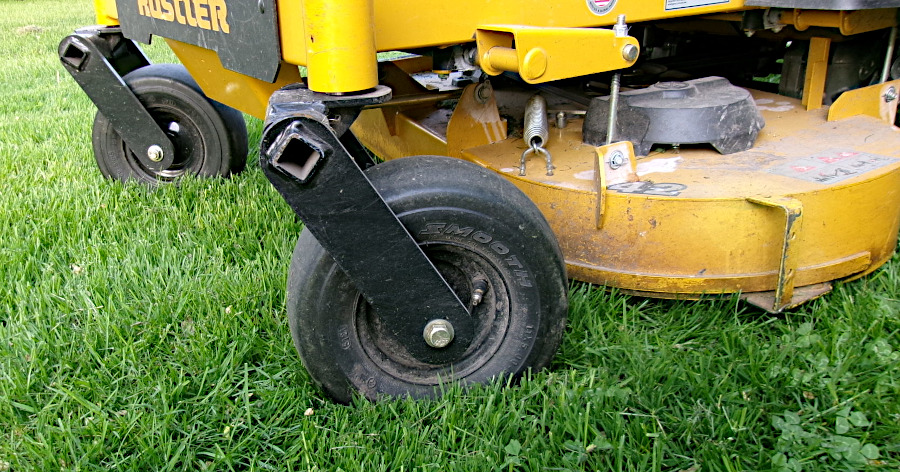
I've read where guys said the Flex Forks make it easier to scalp those high spots but i haven't had any such problem. I think they're likely cutting the grass too short and since the deck height and the suspension offered by the Flex Forks are independent of each other, the cut isn't going to be as consistent on rougher ground as it would be with a Ferris where the deck raises as the suspension is compressed. The Flex Forks also help a little with drive wheel traction when one caster rides over a high spot. If you don't understand why this is, just trust me bro.
My only quibble with the Flex Forks has to do with their design. The standard forks are a single piece of steel, bent to make the fork, whereas the Flex Forks are a 3-piece affair, the two legs being welded together through a square tube. As you can see in the image above, the square tube protrudes from the forks a bit and its edges are rather sharp, thus it's easy to damage anything they might rub against when mowing. I think it would be quite acceptable to grind off some of that protrusion and chamfer the edges.
The Flex Forks are made from significantly thicker steel than the standard forks (roughly 3/16 in. vs. 1/8 in.). The standard forks will bend to fit the width of the caster wheels when you snug the axle bolts (do not over-tighten them!), however the Flex Forks, being infinitely more rigid, resist bending and this left about 3/16 in. of slop between the wheel bearings and the forks which is not good since this could allow the bearings to walk partially out of the wheel hubs. I opted to shim that extra space with a couple of washers. Other than that, installation was very simple, requiring only a ratchet or breaker bar, a 3/4 in. deep-well socket and a wrench of the same size. Again, make sure to not over tighten the axle bolts! You want a little slop between the wheel bearings and the forks else you'll destroy the bearings.
In my case the Flex Forks raised the front of the machine quite a bit which throws off the blade pitch. In one instance Hustler tells you not to readjust the deck because the forks will sag after break-in, then in the Raptor X manual they state "After initial break-in period, level the deck per the Deck Leveling section of the General Service Manual". When i installed them i stuck several 5 gal. gas jugs on the foot pan when the machine was not in use in order to weight the front end in an effort to speed-up the break-in period, but even with that, and after several hours of mowing on bumpy terrain, i found that setting the blade pitch required a lot of adjustment to the point where i almost ran out of threads on the front deck height adjusters.
deck tab
I've seen this tab thingy on a cheap Craftsman stamped deck and couldn't imagine what it was for until i started mowing with the Raptor.
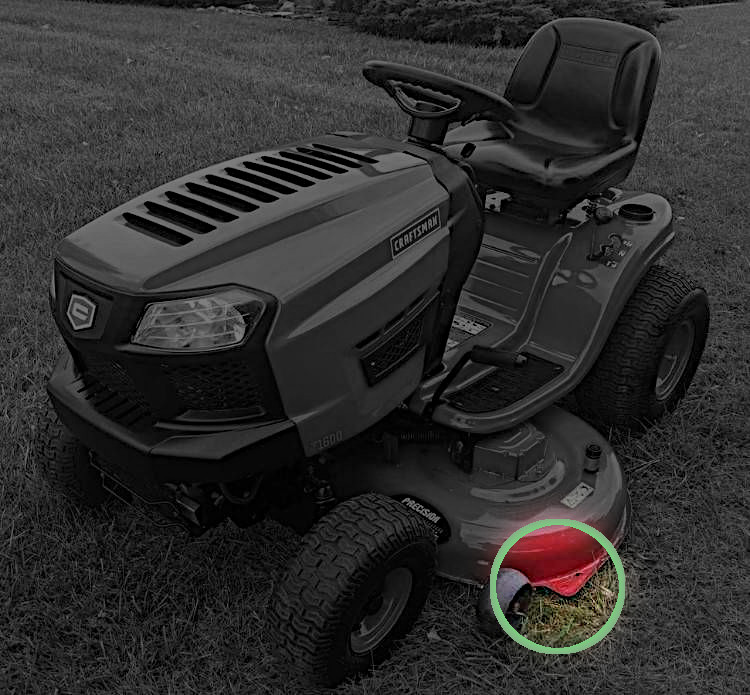
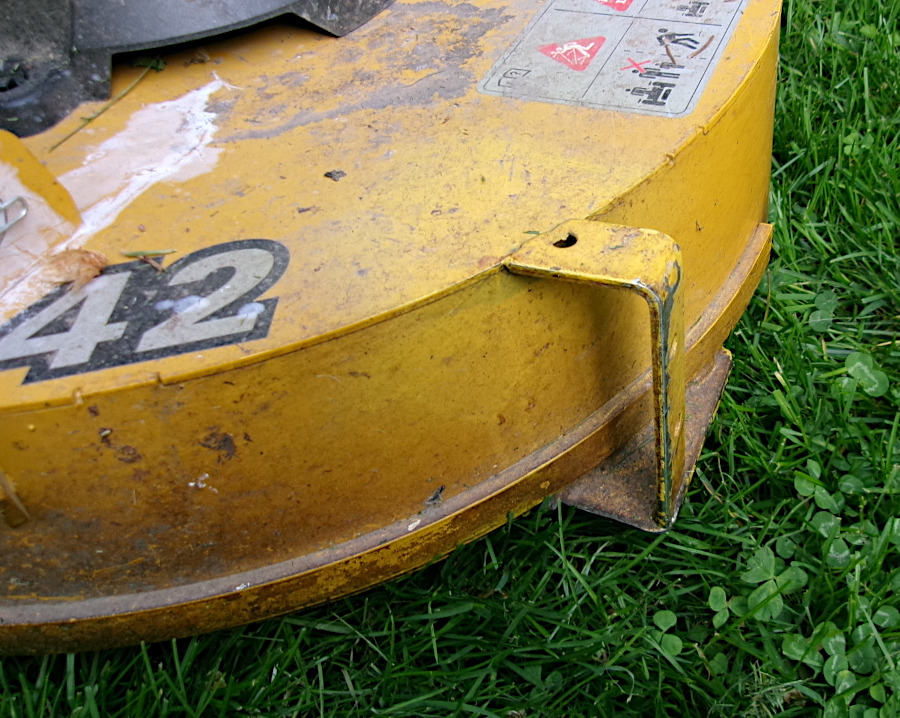
With its rounded deck corner on the left side, taller grass or weeds tend to bend around the deck as mentioned earlier and so i addressed the problem by welding a small tab on the bottom edge of the deck which helps to route grass under the deck rather than bending around it. I didn't realize i wouldn't be able to see the tab while mowing and so i added a piece of an angle bracket on top of it which allows me to determine where the edge of the deck tab is which is crucial when cutting really close to objects.
improved cut quality
The Raptor's cut quality seems to be lacking compared to a commercial machine. I'm not sure what the issue is, but i suspect the blade tip speed is slower than that of a commercial deck. If that is indeed the case, there's a few ways to deal with the issue, the easiest of which is to simply replace the stock blades with higher lift ones. Another option is to use a larger pulley on the PTO. Both of these solutions will make the engine work harder and increase heat and wear on the entire deck drive system and i'd rather avoid that. The solution i opted to try was to attach a sort of baffle along the rear of the deck. Normally something like this would be called a "stripe kit" but my intention was to improve the suction at the front and sides of the deck by restricting the air flow at the rear of the deck.
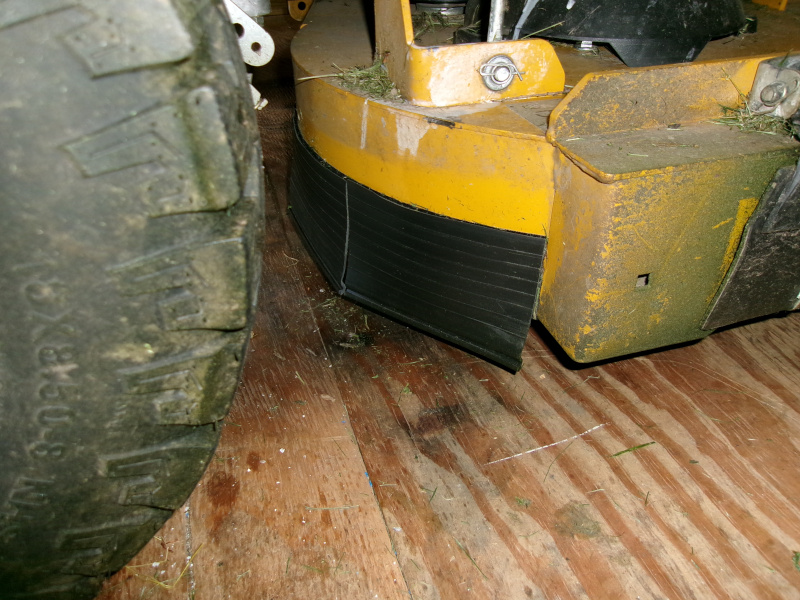
The material i used was about a 3.5 ft. piece of 4 in. rubber garage door seal and it was attached to the deck using 2 in., high-strength hook and loop tape (Velcro). This product is quite flexible and therefor not well suited for striping a lawn. The rubber extends below the bottom of the deck about 1.75 in. (i cut grass at 3 in.) and there's a vertical cut in it where it wraps around the right side of the deck which allows it to easily bend up and pass over any object which might otherwise catch it and rip it off. This mod seems to have improved the cut quality a bit.
UPDATE: Ultimately this modification didn't work. The rubber began to tear for some reason and so i removed it.
air filter
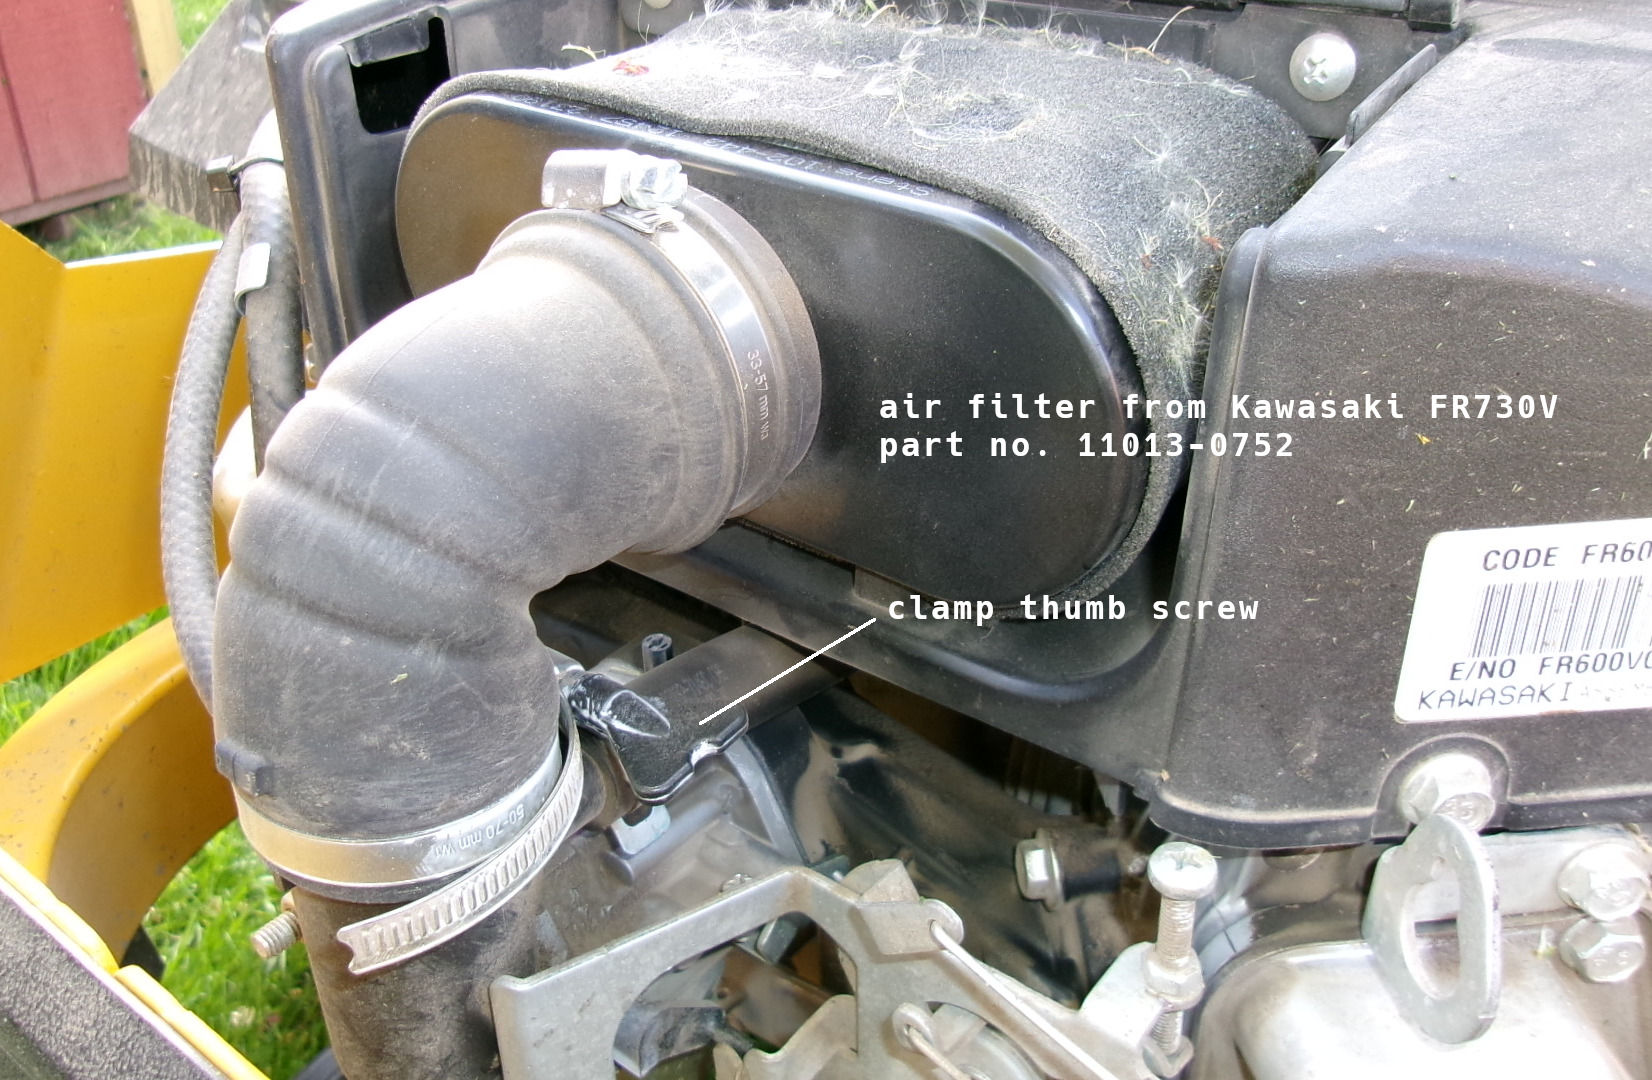
The air filter for the 603 CC Kawasaki doesn't have a lot of surface area and so when i replaced it, i substituted the filter for the FR730V which has much more surface area. If you do this, switch the hose clamps around, putting the one with the thumb screw on the bottom of the air intake tube. This avoids having to bend the tube too much to service the filter which will cause the rubber to crack prematurely. The foam filter cover in the image is just something i had laying around.
floor pan
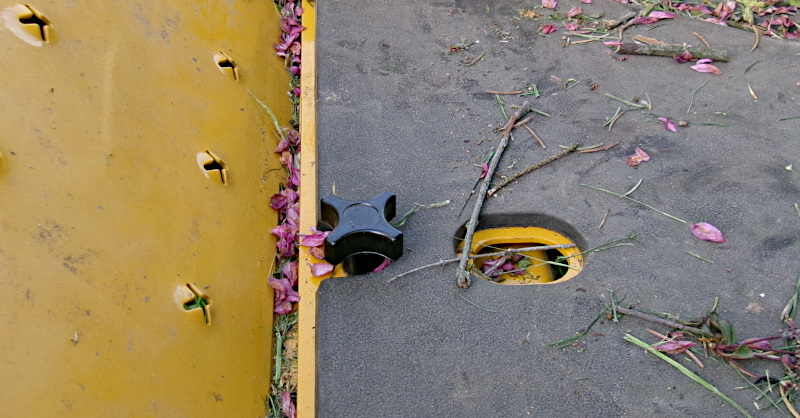
I didn't like having to use a tool to remove the floor pan and so i replaced the bolt with a thumb screw arrangement by threading a bolt up through the existing fender bolt clip and screwing a female thumb knob onto it.
spindle wrench mount
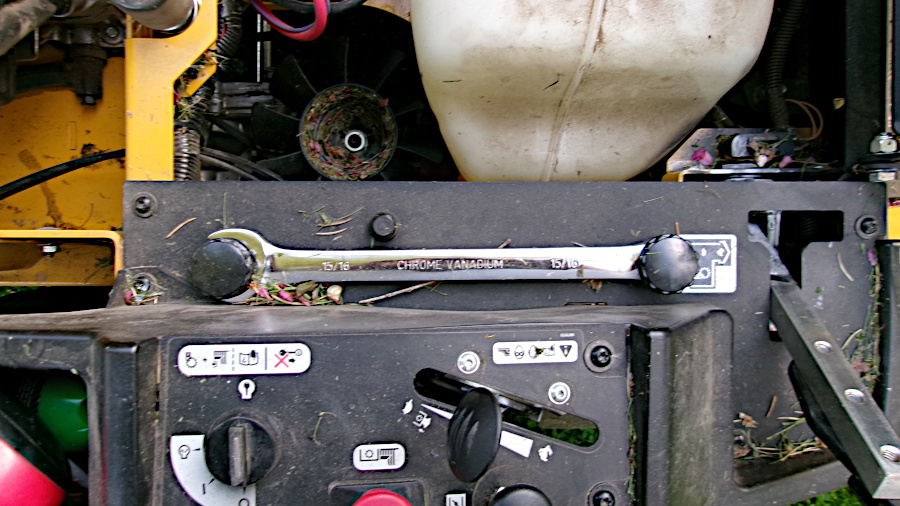
Using some bolts, nuts and thumb screws, i mounted a 15/16 in. wrench next to the seat in the event i need to tighten a blade which can happen if you hit something solid in which case the opposite blade may unscrew itself.
Ignition key mod
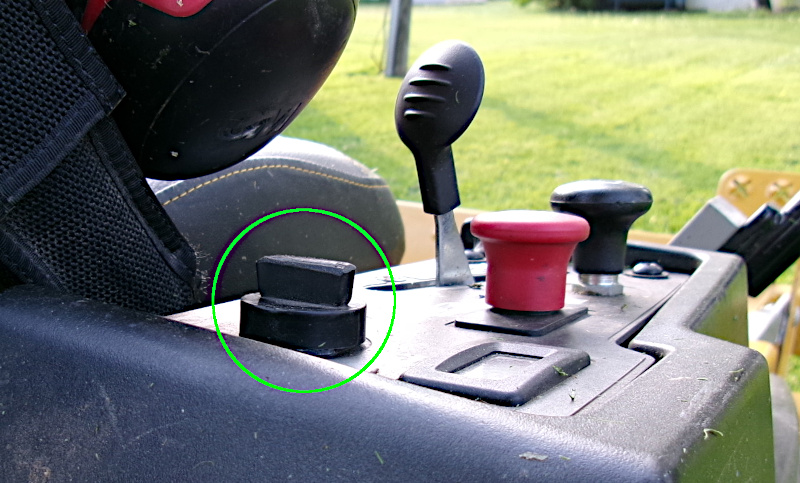
I cut off the top of the ignition key so branches are less likely to activate the starter.
fan caps
I cut some plastic lids to make caps for the fans that cool the transaxles in order to prevent debris from building up in them.
trimmer string storage
The cup holder is a good place to store weed eater line. The wood retainer is held in place with an elastic cord that runs through the drain hole in the bottom of the cup holder.
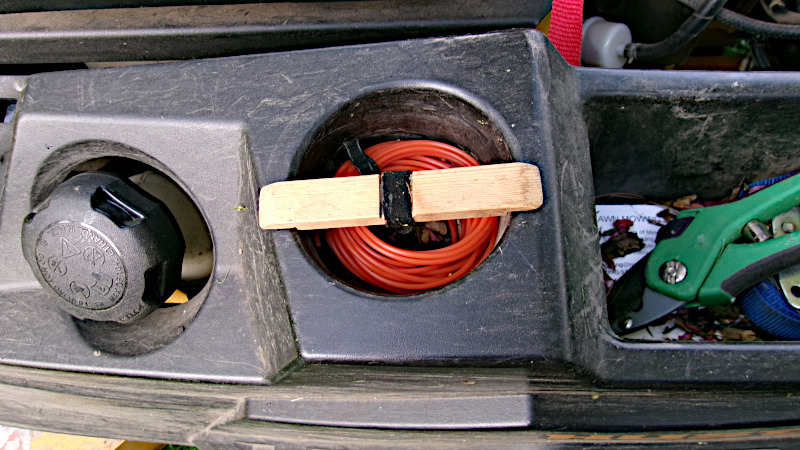
I later replaced this affair with a plastic Talenti ice cream jar that fits very nicely in the cup holder.

issues
One of the caster wheel bearings disintegrated with less than 90 hours on the machine. The repair was simple and the bearing was covered under warranty, but this is something that just never should have happened.
At roughly 150 hours, the ball end socket on one of the steering lever dampers unscrewed itself. After cleaning both the male and female threads with alcohol, i dabbed some CA (Crazy Glue) on it and screwed the socket back on and it hasn't been a problem since.
Also at about 150 hours i changed the oil in the ZT-2200 (EZT) Hydro-Gear transmissions. These drives are marketed as 'maintenance free' and the mechanics at my dealer didn't remember ever having to replace one of these units due to wear, but given i'm using the machine commercially, and given how expensive these pumps are, i thought it best to change the oil. For my model year, the proper way to drain the oil is to rip out the drives, remove the fill plugs and turn them upside down, a procedure i wasn't about to undertake, and so i opted for the ghetto method: I bought a manual fluid transfer pump which had tubing that is about 1/2 in. OD, then bought some 1/4 in. OD tubing and an adapter to mate the two. You will need tubing no more than 1/4 in. in diameter, else it won't be possible to feed it past the gear in the drives in order to reach the bottom of the case. If you have a newer model Raptor, it appears Hydro-Gear is shipping their EZT units with drain plugs in which case you need not go through the hassle i did, so check to see if your drives have drain plugs. Following is the steps i took and they can be applied to any mower with the Hydro-Gear EZT drives without drain plugs:
- READ THE MANUAL (link in the 'manuals' section).
- If it's cold out, you can run the machine around for a bit to warm the oil, but you do not want get it too hot.
- Raise the front of the machine in order to get some pitch on the drives so you can remove as much oil as possible.
- Clean around the transaxle fill plugs. You do not want any dirt getting into the these units!
- Remove the fill plugs and feed the 1/4 in. tubing past any obstacles so that it reaches the bottom of the case. This is a fiddly process that required twisting the tubing around while feeding it into the case. You have to find just the right spot to get the tubing to feed all the way down.
- Pump out the oil in both drives. I used a container on which i placed a mark at the 56 oz. level so that i could see how much of the oil i was able to extract, which ended up being roughly 50-52 oz., approximately 4-6 oz. less than their total capacity. If you fail to extract this amount of oil, the 1/4 in. tubing probably isn't reaching the bottom of the case. I noticed a LOT of extremely fine metal flakes in the oil which i assume is normal given there is no proper filter on the EZT drives, only a screen.
- Level the machine and re-fill the drives to about 1 in. from the top of the case (the top of the fill hole). Most people seem to use a synthetic 20w50 motor oil, and apparently Hydro-Gear says this is acceptable, but Hustler makes a special hydraulic oil with added zinc which is an important additive and so i suggest using it. This was also highly recommended by my mechanic.
- With the rear wheels off the ground and the pump bypass valves open (there's a lever thingy under the motor deck which you pull and lock into place to disengage the drives), i started the engine and, while at idle, i moved the drive control levers slowly full forward and full reverse, repeating this process many more times than the manual recommends, which is 5 or 6. I then repeated the same process with the bypass valves closed while the engine was at idle, then again at half throttle, then again at full throttle. DO NO SKIP THIS PURGING PROCESS! I've seen what can happen to these hydraulic pumps if they aren't properly purged when the guy i worked for forgot to do this on a commercial machine and had to spend a couple thousand dollars as a result, hence why i purged for much longer than the manual states (you cannot 'over-purge' the drives).
- Re-check the oil level and tighten the fill caps, then drive the thing around a while and check the oil level again just to be safe.
final thoughts
If you're a home owner who has never used a zero turn mower and you don't care about pattern mowing, it might be difficult to justify spending 4 grand on a lawn mower, however if you do care about pattern mowing, or you just want to one-up your neighbor, i would absolutely suggest considering the Hustler brand, just make sure the model you choose will run continuously on the slopes you have to deal with without burning up the engine due to a lack of lube. I tend to do quite a bit of research before making a purchase and Hustler seems to build a pretty solid product at a reasonable price and their machines generally get good reviews from real people that own them, however i would strongly suggest avoiding the first iteration of a new model. For example, the Raptor SD had several non-trivial problems when it was released.
Overall i'm quite pleased with my purchase of the 2022 Hustler Raptor X. Other than a caster bearing disintegrating, my biggest complaint is traction while reversing. I think the $4,000 price tag was reasonable given its quality and features which seem to only be matched by other brands costing more. The machine is structurally sound, plenty powerful and dirt simple to operate and maintain. While the ride and cut quality fall short of a commercial unit costing thousands more, so does its price tag.
manuals
- Hustler Raptor Series Spec Sheet 2022.pdf
- Hustler Raptor X Model 939694 Parts Catalog.pdf
- Hustler Raptor X-XL General Service Manual.pdf
- Hustler Raptor X-XL Operators Manual.pdf
- Kawasaki FR600v Owners Manual.pdf
- Kawasaki FR600v Service Data Sheet.pdf
- Kawasaki FR600v Service Manual.pdf
- ZT-2100 / ZT-2200 (EZT(R)) Integrated Zero-Turn Transaxle Service and Repair Manual
going anal
If you've never operated a zero turn mower and are considering buying one, here's (more than) a few things you should know.
tracking: DON'T make this mistake!
Given that multiple people on the interwebs provide potentially very costly misinformation regarding mower tracking (see here, here and here for example), i felt it worthwhile to highlight this issue which hopefully will save someone a pile of money.
There are 3 primary adjustments one might typically make to the hydraulic transmissions and their linkages on any ZTR mower: forward and reverse speed, neutral point, and tracking. The neutral point is adjusted on the linkage at the wheel motors, the purpose of which is to prevent the motors from turning when the drive control levers are in their neutral/park position and thus prevent damage to the transaxles. Tracking refers to how the mower tracks when the drive control levers are in the their full forward or full rearward position. If the mower tends to veer left or right, and assuming tire pressure is correct, then tracking may need to be adjusted. If you turn to YouTube for help however, prepare to fork out thousands of dollars for following stupid advice if you land on one of the many videos that fail to adjust tracking properly.
Regarding the Raptor X, XL, and ZTR mowers in general, forward tracking and speed is adjusted at (or near) the drive control levers, never at the wheel motors! There is no adjustment for reverse speed or tracking on the Raptor X, though there often is on commercial machines. The linkage adjustment on the wheel motors for the Raptor are for setting the neutral point, not tracking as many people seem to assume. If the machine is not tracking straight and you adjust tracking with the linkage on the wheel motors, you can destroy the transaxles. Simply follow the instructions in the General Service Manual (linked above) in the "Steering control lever neutral adjustment" and "Control lever stops adjustment" sections and you'll have no problems.
Forward speed is also adjusted with the control lever stops and, contrary to the manual which states to reduce the speed of the faster wheel if tracking is off, you can instead increase the speed of the slower wheel if there's enough adjustment.
general tips
- Take care of your junk. Always wear eye and ear protection when mowing (or edging)! I'm not a safety nut, but trust me, both are crucial if you value your eyes. Also, keep your mouth closed when edging if you value your teeth.
- Drive through it. Zero turn mowers do not get good traction when going down a grade. Stopping, even on a slight downhill grade, needs to be done carefully, especially if the grass is wet, or very dry. If you do start to slide, don't panic and don't try to stop or reverse the wheels! Your best chance of avoiding a catastrophe is to regulate the speed of the wheels and drive through the situation if possible. This can often be done by increasing the speed of one wheel and/or slightly decreasing the speed of the other.
- Avoid mowing downhill. Yes, a zero turn can mow very steep slopes, but only by traversing them or mowing uphill. If you point the front of the machine downhill on a steep slope, you are very likely to lose control. Many a human has transitioned into the next dimension as a result of flipping a ZTR mower on a steep slope, especially when it tumbles into a body of water or rolls on top of them.
- Don't pivot! When pattern mowing with a zero turn it is very tempting to quickly pivot on one wheel at the end of a pass when lining up for the next pass, however doing so will create bald spots in the lawn, especially if the ground is wet. Instead, practice keeping both drive wheels rotating when you turn around to line up for your next pass. Learn how to do a 3-point turn, also known as a 'Y' turn.
- Keep your blades sharp! Us commercial guys will check the blades and clean the decks every day and sharpen the blades at least once a week. Unlike some people warn against, sharpening blades with an angle grinder is perfectly fine, just keep the same angle as the factory set and make several light passes in order to avoid heating the edge of the blade too much since this will reduce its hardness (don't allow the edge to turn blue or start to glow). I've been experimenting with filing or grinding a very small, but steep chamfer on the edge after the blade has been sharpened so that the very tip is more like this: /_ instead of this: < . The thinking here is that the edge won't be so thin and thus should remain sharper longer and be slightly less prone to nicking while still providing a clean cut.
- Keep your blades balanced. Keeping your blades balanced will avoid excess vibration which can cause all sorts of things to wear out faster. You can balance a blade by hammering a nail in your wife's heirloom dresser and hanging the blade on it. Actually the better way is to either buy an expensive balancer that has a bearing, or save yourself a the money and find a bearing that you can attach to a wall. If the OD of the bearing is less than the diameter of the hole in the blade, wrap it with tape or some sort of sleeve, otherwise balancing won't be truly accurate. Hang a blade on the bearing and if one side dips, grind a little off the heavy side and check it again.
- Don't cut your grass too short (like virtually every home owner does). Doing so generally will not result in having to cut it less often as everyone seems to assume, plus it allows more sunlight to reach the soil which dries it out faster so you'll have a brown lawn before anyone else during those the dry spells (though you could always dye it green i suppose - they actually do this down south). Personally i generally cut at 3 inches and i'll skip a week or three in very dry weather.
- Never push or tow a ZTR without first disengaging the transaxles. Doing so can destroy the hydraulic pumps. With the Raptor this is accomplished by simply pulling the 2 hydraulic valve bypass tabs on the drive motors.
- Take care of your tires. The front caster tires on many ZTR mowers are notoriously easy to puncture. If you have to contend with thorny bushes, or accidentally run over a piece of barbed wire fencing, it is highly likely you will perforate a caster tire. While you can plug or patch them, you can obviously do so only after you've deflated a tire which potentially leaves you with a flat in the middle of a job, although with the Raptor X this isn't a big deal if it's a caster tire since they tend to retain their shape even with no air. Plugging the thin rubber of the caster tires can rip the rubber, thus making the hole even larger and potentially ruining the tire altogether. One solution is to inject a tire sealant, such as Slime, before you run over that board with a nail in it that your kid left in the yard. Since most/all mower tires are tubeless these days, you want the 'blue label' Slime. You can of course do the rear tires as well, in which case you might want to purchase the large pump container which may be cheaper in the long run. Actually i think there's a better product than Slime but the name escapes me at the moment. Personally i still carry a plug kit, a little bottle of soapy water and a Co2 compressed air kit in my tool pouch for those times when tire sealant may not cut it. DO NOT fill your tires with spray foam insulation! Because of multiple YouTube videos i decided to try this myself on a Cub Cadet because i got tired of sticking a bazillion plugs in the casters after running over pricker bushes. I had watched several videos of guys saying how incredibly well this works and i can virtually guarantee that every single one of them lived to regret it because foam insulation very quickly breaks down into granules once the tire is weighted. A better solution is to have the caster tires filled with foam that's specifically made for tires, but that can be rather expensive.
- Preventive maintenance
- Before every use: Check the engine oil level and check for engine oil and ttransaxle oil leaks (no need to check the hydraulic oil level on a sealed system like the Raptor X uses).
- Before every use: Check tire pressure.
- After every use: Clean the deck, both the top and bottom, and make sure the belts and pulleys are OK and free of debris. Getting under the deck of a ZTR is easier if you use a single car ramp and run one caster tire up on it (use 2 ramps for a lawn tractor).
- Monthly: Make sure the blades are sharp and not bent. This needs to be done more often if you're a commercial guy.
- Occasionally: Remove and check the air filter, tapping it on a hard surface to dislodge excess debris.
- Occasionally: Have a helper start the mower and engage the deck while, from safe a distance, visually check the deck belt tensioner pulley for excess movement. A little movement is normal since V belts are imperfect, but excessive movement may indicate it's time to replace the belt.
If you want some more tips, you can read the following "guide" which i wrote for "the new guy" at work...
THE TOTALLY HALF-ASS MOWING GUIDE - FOR DUMMIES! (click me)
or how not to destroy shit and kill yourself on your first day!

MOWING STUFF
------------
RULE 1: DFU (Don't Fuck Up)

ZERO-TURNS: zero-turn mowers handle *very* differently than a regular riding mower:
* ascending a slope ...... : good traction, braking and steer-ability
* level ground ........... : maximum traction, braking and steer-ability
* traversing a slope ..... : fair traction and braking, potentially poor steer-ability
* descending a slope ..... : poor traction, braking and steer-ability - NOT. EVEN. KIDDING.
* descending a steep slope : pray! (sacrificing a small animal may help - untested)

DECK: engage the deck around half throttle and drop to idle before disengaging the deck - this saves wear on the clutch that drives the deck belt

THOSE DOWNHILL SLOPE 'OH SHIT!' MOMENTS: if (when!) you drive down even a moderately steep grade, the drive wheels can start to lose traction - *DO NOT* TRY TO STOP! - keep the drive wheels turning and steer through that shit like a real man (who isn't the least bit afraid of getting cut in half by "the fence"...more on that later)

REALLY REALLY STEEP INCLINES: slopes too steep to traverse can sometimes be mowed bottom-to-top, not that this is advisable or particularly smart - BE VERY MINDFUL OF FLIPPING BACKWARDS, something that can happen virtually without you noticing; if the machine starts to wheelie, quickly and smoothly move the drive controls rearward and back down the hill, gradually increasing speed if necessary to prevent flipping over - never try to slow or stop when backing down a steep incline - lastly, steep slopes are often rough/rocky due to erosion so remember to raise the deck when mowing such terrain

TRAVERSING SLOPES: there is a maximum incline at which you can point nose-down on a slope whilst still maintaining clean underwear - i don't know what the hell it is, and it depends on the machine, conditions, planet alignment, etc., but i'll guess it's typically around 20 deg. - be careful when traversing steep slopes; if you start sliding sideways down a slope and then suddenly stop, such as by sliding into a ditch, obstacle, etc., the mower can flip

"!!!THE FENCE!!!" : when the boss says "DON'T GO DOWN THERE KID OR YOU'LL CRASH THROUGH THE FENCE!!!", rest assured that he knows what the F he's talking about - i literally made this very mistake immediately after i was warned, but i didn't panic and instead drove the machine out of the situation - i dunno why people shit their pants in times like these because my sphincter tightened up to the point where, had i farted, it would've sounded like a dog whistle

FUEL TANKS: don't cut too close to those fuel tanks else the back wheel will contact it, potentially knocking it off its legs and causing an environmental catastrophe the likes of which would surely have Greta knocking at your door

FENCE LINES: watch for nails/objects sticking out of fences which can puncture a tire - you, we don't care about

THORNS: thorns can/will puncture the tires, particularly the front casters

TURNING: when the end of a stripe is reached and you turn around to do the next pass, turn in such a way as to keep both tires rolling - never pivot on one wheel!

NOT TURNING: if you have trouble holding a straight line, 1) reduce alcohol consumption, 2) try aiming a caster at a distant object or just a couple inches away from the edge of your last cut

TURNING IN CIRCLES: despite being zero-turn mowers, you cannot always mow around a tree or other object without backing up to realign the deck else the rear tire will hit the object

BLOW IT OUT YOUR...: be mindful of where you're blowing the deck discharge - try to not to blow it onto sidewalks, roads, buildings, cars, heat exchangers, people, etc. (people who you don't like are fair game) - sometimes this cannot be avoided, so make sure to clean off these areas either with the deck exhaust or a leaf blower

JUNGLE GRASS: tall growth, especially if green/wet, will clog the shit out of the deck - always be mindful of engine RPM and the deck discharge; if clippings start to block it, do not shut off the deck - instead: 1) quickly come to a stop and raise the deck all the way 2) rapidly drop the throttle to idle and quickly increase it again to full - it is often at this point, near idle, when piles of crap will drop from the deck like "The Big D" (Diarrhea) because it's not being held up as much by the air from the blades - do this a couple of times - if the engine stalls, disengage the deck, kill the engine and clean it by hand before starting it again since engaging the deck while it's full of crap puts *enormous* strain on the deck belt and clutch

WOW, SHE'S HOT: inevitably people will approach you at some point, perhaps to just to walk by or bitch about you running over their cat, or perhaps to ask for your hand in marriage - always idle down and disengage the deck while they pass... unless it's the 'cat lady' yelling at you for running over "Precious", in which case you can just keep going

SHARPENING BLADES
-----------------
i no longer taper the blades to a fine edge - they get dull/damaged too fast - instead i sharpen them to a point as usual, then file a 10-20 deg. angle to chamfer the edge, very much like this: /__ - the height of this chamfer should probably not exceed 1/16th of an inch - this angle can be very quickly re-sharpened several times before the rest of the taper on the blade needs to be ground - be careful not to heat the blade to where the edge discolors (turns blue) - doing so removes the temper

DISCLAIMER
----------
this guide (if you can call it that), hereafter referred to as "The Guide", may or may not be complete, accurate, or law abiding. the author(s) of The Guide is/are not professionals and may, in fact, be mentally challenged and/or intoxicated. side effects due to ingesting The Guide are rare and may include: nausea, heart attack, stroke, genital swelling, uncontrollable crying, depression, projectile vomiting and/or 'The Big D'. contact your doctor immediately if you experience any of these symptoms. the opinions expressed in The Guide do not necessarily reflect those of management. any similarities to actual people or events is completely coincidental, mostly.
more safety stuff
Because it's such an important subject, i want to elaborate a bit on the slope safety advise that eXmark provides in their video, Incline Safety Zone - Riding Mower Safety on Slopes, which is probably similar to what other manufacturers advise. Besides being insulting advice regarding mowing slopes exceeding 15 degrees, in my considered opinion they deliver some piss-poor, one-size-fits-all advise that could get you hurt or killed. In the event you lose traction on a slope eXmark suggests to first disengage the deck and then "move slowly and carefully off the slope" which the operator in the video does by turning down the slope. We already discussed why this may be the wrong thing to do. Every situation is different and so such generic advise is terribly inadequate. For one, there probably isn't a commercial guy on the planet who considers a 15 degree slope to be the maximum incline for mowing. That's just silly, but eXmark does this for legal purposes no doubt. Secondly, if you start sliding on a slope you generally do not want to fiddle around with the deck which means having to remove one of your hands from the drive controls at a time when fractions of a second may be crucial. Yes, you want to disengage the deck as soon as possible, but not at the expense of losing control. Instead you may want to focus on controlling direction, something you can't do if your hands aren't on the drive controls. Thirdly, advising operators to "move slowly and carefully off the slope" implies that this is actually possible when in fact it often is not. Assuming the incline doesn't change, or becomes even steeper, perhaps eXmark can explain the math that allows you to begin sliding down a slope and then somehow magically stop! I certainly can't. If you are able to slowly reduce speed, great, otherwise it is probably best to concentrate on direction, not speed, and drive through the slide when possible.
Of course my advise is also inadequate as there are a plethora of variables which can alter what you should and shouldn't do depending on the situation, so use your head and adapt. For example, if you're sliding toward the edge of a cliff, or a body of water, or onto a busy roadway, then you might opt to kill the engine, if there's time, and abandon the machine, though this can be easier said than done given that such emergencies often have a duration of a few seconds or less.
'Luke' offers many good tips in these next 3 videos where he cuts a few small lawns. Here he's riding a stand-on zero turn, but all of this applies to a sit-on machine as well.
- Don't Shoot Projectiles at Client Property! Training Episode 1 - YouTube
- How to Mow the Lawn - What to Keep in Mind: Training Episode 2 - YouTube
- How to Mow Steep Hills - Scag Cheetah II: Training Episode 3 - YouTube
what (else) could possibly go wrong?
Sit-on zero turn mowers generally have a very low center of gravity which instills confidence when traversing steep slopes once you become intimately familiar with the machine, but it's also on steep slopes where many serious accidents occur. Don't be a statis-dick. Beyond injuring or killing themselves, idiots with lawn mowers have also managed to injure or kill others, including their own children.
- How NOT to mow a hillside 1st day with the new mower - YouTube
- Redneck Flips Zero Turn Lawnmower In his Underwear! - YouTube
- Guy loses control of lawnmower - YouTube
- Landscaper dies in riding lawn mower accident, Jacksonville police say - YouTube
- Landscaper killed in mower accident in Hebron - YouTube
- Person Killed in Lawn Mower Accident - YouTube
- Landscaper killed while mowing - YouTube
- A Lawnmower accident claims the life of a Norfolk County man - YouTube
- Landscaper killed in Springfield Township lawn mower accident - YouTube
- Mt. Airy Man, 82, Dies After Lawnmower Flips Over On Top Of Him - YouTube
- Child Injured In Lawn Mower Accident - YouTube
- Girl Injured By Lawn Mower Through 2nd Surgery - YouTube
- Child hospitalized after accident in Penn Township - YouTube
- Detectives: 2-year-old boy's leg run over by lawn mower - YouTube